Fermented Foods & Frugal Living
How I Save Over $600 a Year Making Homemade Milk Kefir (And You Can Too)
Two ingredients, one jar, and 10 minutes of hands-on time. Here’s exactly how I ditched store-bought probiotic drinks for good.
Quick Summary: Store-bought kefir runs $5–$7 per quart. Homemade milk kefir costs roughly $0.40–$0.50 per quart when made with whole milk. If your household drinks a quart every 2–3 days, as mine does, you’ll save $500–$650 per year, with better probiotics and no preservatives.
I discovered homemade kefir three years ago while standing in the dairy aisle, watching $6.49 disappear from my wallet for the third time that week. I thought: This is just fermented milk. How hard can it be?
The answer? Remarkably easy. Today, I make a quart of kefir every two days, spend less than 10 minutes actively, and my grocery bill reflects it. This guide covers everything you need to know — the process, the science, the gear, and the honest math.
Based on a quart every 2 days: store-bought at $6.50 vs. homemade at $0.50. That’s $6 saved per batch, 182 batches per year.
What Is Milk Kefir (And Why Should You Care)?
Milk kefir is a fermented dairy drink made by culturing fresh milk with kefir grains — rubbery, cauliflower-like clusters of bacteria and yeast living in a symbiotic matrix. The grains consume lactose in the milk, transforming it into a tangy, slightly effervescent drink teeming with live probiotic cultures.
Unlike yogurt, which typically contains 2–7 bacterial strains, a well-maintained kefir grain culture can contain 30–50 distinct bacterial and yeast strains. This microbial diversity is why fermentation researchers and gut-health advocates consider kefir one of the most potent natural probiotic foods available.
Commercially, this gets diluted. Store-bought kefir is pasteurized after culturing (which kills live cultures), then reseeded with a controlled commercial starter. Homemade kefir made with live grains stays truly alive all the way to your glass.
The Honest Cost Comparison
| Item | Store-Bought | Homemade |
|---|---|---|
| Cost per quart | $5.49 – $7.49 | $0.38 – $0.52 |
| Probiotic strains | 6–12 (commercial starter) | 30–50+ (live grains) |
| Live cultures at consumption | Variable (often pasteurized) | Billions of active CFUs |
| Additives/preservatives | Often yes | None |
| Equipment (one-time) | — | ~$20–35 total |
| Cost per year (1 qt every 2 days) | ~$1,186 | ~$91 |
| Annual Savings | ~$612–$1,095 (avg ~$850 depending on milk price) | |
Milk cost calculated using whole milk at $3.49/gallon (Midwest average). Equipment costs are one-time; kefir grains reproduce and last indefinitely with proper care.
What You Need: The Complete Supply List
The beautiful thing about kefir-making is how minimal the setup is. Here’s exactly what I use, with direct links to the products I recommend on Amazon.
📋
Affiliate Disclosure: The product links below are Amazon affiliate links. If you purchase through them, MidwestMoneySavers.com earns a small commission — at absolutely no extra cost to you. These commissions help keep this blog free and allow me to keep sharing money-saving content. I only ever link to products I personally use and trust. Thank you for your support! 💚
|
🥛
Milk Kefir Grains
The living culture. Buy once; they multiply forever. Look for fresh/live grains, not freeze-dried.
~$10–16 · one-time purchase
|
🬋
Wide-Mouth Mason Jar (1 qt)
A wide mouth makes straining easy. Avoid reactive metals. Ball or Kerr jars work perfectly.
~$3–8 · one-time purchase
|
|
|
🧳
Plastic Mesh Strainer
Fine mesh, non-metal only. Separates grains from finished kefir without damaging the culture.
~$5–10 · one-time purchase
|
☕
Coffee Filters or Cheesecloth
Covers the jar during fermentation. Let’s CO₂ escape while keeping out dust and bugs.
~$2–5 · one-time purchase
|
|
|
🥄
Wooden or Plastic Spoon
For stirring before straining. Metal spoons can inhibit live cultures over time — avoid them.
~$1–3 · one-time purchase
|
🍭
Whole Milk
Your only ongoing cost. Whole milk produces the creamiest kefir. Avoid ultra-pasteurized (UHT).
~$0.43/quart · recurring
|
Pro tip on grains: Once you have live grains, they reproduce with every batch. After a few weeks, you’ll have enough to share with friends, sell, or freeze as backups. The initial purchase is truly a one-time investment.
How to Make Milk Kefir: Step-by-Step
The process takes about 5–10 minutes of hands-on time per batch, plus 18–36 hours of passive fermentation.
Measure your grains
Place 1–2 tablespoons of kefir grains into a clean, dry 1-quart mason jar. A general ratio is 1 tbsp of grains per cup of milk.
Add fresh whole milk
Pour 3–4 cups of whole milk directly over the grains. Avoid ultra-pasteurized (UHT) milk — the proteins are denatured, and grains struggle with it.
Cover and leave at room temperature
Drape a coffee filter or cheesecloth over the jar opening and secure with a rubber band. Do not seal airtight — fermentation produces CO₂ that needs to escape.
Strain out the grains
Pour the fermented kefir through your plastic mesh strainer into a clean bowl or pitcher. Gently shake the strainer — don’t press or squeeze the grains. Finished kefir goes into the fridge; grains go back into the clean jar.
Start your next batch immediately
Add fresh milk to the grains and repeat. When grains double in size, split them — use the extra for a second jar, freeze as backups, or share with friends.
Enjoy and customize
Fresh kefir is drinkable immediately, but improves with a second ferment in the fridge for 12–24 hours. Drink plain, blend into smoothies, use in overnight oats, pancake batter, or as a buttermilk substitute in baking.
Troubleshooting Common Issues
My kefir is too thin or watery
Usually means under-fermentation or too few grains relative to milk. Try reducing milk slightly — use 2 cups per tablespoon of grains — or extend fermentation time by a few hours.
My kefir is too sour or fizzy
You’ve over-fermented. Reduce fermentation time by 4–6 hours, or use a slightly cooler spot. Summer batches almost always need less time than winter ones.
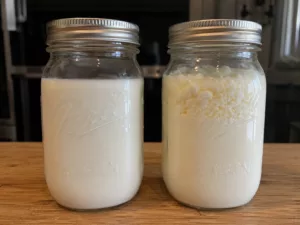
I see separation — thick white top, watery bottom
Completely normal. This is kefir separating into curds and whey. Give it a good stir before straining. The whey is nutritious and works great in smoothies or bread baking.
My grains have a pinkish or orange tint
This is a contamination warning. Discard those grains and start fresh. Healthy grains should be white to pale yellow with a rubbery, cauliflower texture. Keep everything clean and non-metallic.
Frequently Asked Questions
Yes — kefir’s fermentation creates an acidic environment hostile to pathogens. Millions of people have made it at home for centuries. Use clean equipment and fresh milk. If it smells off (not just tangy but putrid), discard it.
You can, but the results will be thinner and less creamy. The grains will still ferment happily. For the richest kefir, whole milk is strongly recommended.
Many people with lactose intolerance tolerate kefir well because the bacteria consume most of the lactose during fermentation. Individual tolerance varies — start with small amounts and see how your body responds.
Strained kefir keeps for 2–3 weeks in a sealed jar in the refrigerator. It will slowly get tangier over time. Most households go through it long before the 2-week mark.
Amazon has reliable live grain sellers (see our affiliate links above), or check local fermentation communities — many kefir makers give away excess grains for free. Facebook groups, farmers’ markets, and natural food co-ops are great sources.
The Bottom Line on Savings
Here’s the math laid out simply: if you’re buying one quart of commercial kefir every two to three days at an average of $6.50 per quart, you’re spending roughly $100–$120 per month on a product that costs about $8–10 per month to make at home.
Your equipment pays for itself in the first week. Your grains — bought once, multiplying forever — effectively become free after month one. From that point forward, your only cost is milk, which you’d be buying anyway.
Have questions, or have you already started making your own kefir? Drop a comment below — I read every one.
— Kelly
Did this guide save you money?
If you found this article helpful, sharing it takes just one click and helps other Midwest families discover how easy (and cheap!) homemade kefir really is. Every share means the world to this little blog. 💚
Homemade Milk Kefir
MidwestMoneySavers.com · By Kelly Gilbert
|
Prep Time
5 min
|
Ferment Time
18–36 hrs
|
Yield
1 quart
|
Cost
~$0.50 /qt
|
Difficulty
Easy
|
|
Ingredients
— 1–2 tbsp live milk kefir grains
— 3–4 cups whole milk (not UHT)
Equipment
— 1-qt wide-mouth mason jar
— Plastic or nylon mesh strainer
— Coffee filter or cheesecloth
— Rubber band
— Plastic or wooden spoon
Affiliate link — supports this blog at no cost to you.
|
Instructions
1
Place 1–2 tbsp kefir grains in a clean, dry 1-quart mason jar.
2
Pour 3–4 cups of whole milk over the grains. Avoid ultra-pasteurized milk.
3
Cover with a coffee filter or cheesecloth secured with a rubber band. Do not seal airtight.
4
Ferment at room temperature (68–78°F) for 18–36 hours. Taste at 18 hours — done when tangy and slightly thickened.
5
Strain through a plastic mesh strainer into a clean jar. Do not squeeze the grains.
6
Refrigerate finished kefir. Return grains to the jar with fresh milk and repeat.
|
🌡 Temperature: Warmer kitchens ferment faster. Taste before the clock — your senses are the best timer.
😴 Vacation storage: Submerge grains in milk, seal, refrigerate up to 3 weeks. Wake them with 1–2 warm batches.
📈 Grain growth: Healthy grains double over time. Split them, freeze extras, or share with friends.
🥛 Second ferment: After straining, let kefir sit covered in fridge 12–24 hrs for deeper flavor and light carbonation.